Articles & Playbooks
The pro workflow: source it, vet it, slice it, ship it.
We need to confess something.
The first time we used NotebookLM, we used it like a glorified PDF reader with attitude.
We uploaded a doc, asked a question, got an answer, nodded like we were productive… and moved on.
Then we watched someone else use it.
NotebookLM wasn’t “chatting.”
It was doing the kind of work that normally requires:
- a researcher
- a project manager
- a designer
- and someone whose job is literally “make this into slides by 6pm”
And we had that exact moment of realization:
“Wait… we could’ve been doing that this whole time?”
Yes. We could.
So this is the workflow, the professional version. The one that turns NotebookLM from “chat with my PDFs” into “our research department that never sleeps.”
And here’s our contrarian rule upfront:
Don’t ask NotebookLM a single “real” question until you’ve validated your sources.
Treat it like a new hire. Check references first.
The Big Mental Model: NotebookLM Is Not a “Chat-bot.” It’s Research Intelligence.
Most people treat NotebookLM like the usual basic chatbot:
- Upload a file or two
- Ask a question
- Click around hoping to find something useful
- Repeat until boredom wins
That’s a massive underutilization.
NotebookLM is built for:
- Autonomous sourcing (it finds data for us)
- Validation workflows (it helps ensure our research is reliable)
- Generative production (it turns research into slide decks, infographics, reports, quizzes, mind maps, and more)
If we use it like a basic chatbot, we get basic results.
If we run it like a workflow engine, we get… the kind of output that makes teammates ask:
“How did you do that so fast?”
“We didn’t.”
“NotebookLM did.”
A 30-Minute “Proof” Sprint.
Let’s make this real with a quick sprint example.
Goal: Build a usable research package on AI alignment that includes:
- a validated source base
- a briefing doc
- a clean slide deck
- one visual (infographic)
- plus a debate-style audio overview to learn fast
Time: ~30 minutes of actual steering + waiting for generation.
By the end, we don’t just “understand the topic.”
We have assets we can share, present, and build on.
That’s the standard we’re aiming for.
First Rule: Notebooks Must Be Topic-Specific
When we head to NotebookLM, we’ll see our notebook list (or an empty state if it’s our first time).
We can create a new notebook immediately.
But here’s the critical detail most people overlook:
Notebooks should be topic-specific.
Don’t create notebooks called:
- “Research”
- “General Notes”
- “Random Stuff”
Create notebooks like:
- “Competitive Analysis — Q1 2025”
- “AI Video Generation Research”
- “AI Alignment Research”
This sounds small, but it matters because NotebookLM performs better when sources are related and focused on a single topic or project.
So we hit the plus icon, create a new notebook, and land on the source upload screen.
And this is where output quality gets decided.
Stop Uploading “A Few Files.” Start Building the Information Landscape.
The common mistake is simple:
Upload one or two files… then hope NotebookLM does magic.
Instead, we zoom out and think strategically:
What does the complete information landscape look like for our topic?
Where does information exist?
- PDFs (papers, reports)
- YouTube videos (lectures, talks, panels)
- Websites (blog posts, docs, industry commentary)
- Google Docs (notes, internal memos, drafts)
- Audio files (podcasts, interviews)
- Plain text (copy/paste research snippets)
The real power of NotebookLM comes from combining multiple formats and sources, creating a web of information, not a lonely stack.
Example (AI alignment):
- Academic papers = rigor
- YouTube lectures = clarity
- Blog posts = industry context
- Podcasts/transcripts = how people actually frame the debates
One format = one angle.
Mixed formats = 360° understanding.
We’ll do that later.
First: we need a strong starting source base.
The “Cheat Code” Feature: Deep Research Source Discovery
For our sprint, we create a research notebook on AI alignment and title it:
AI Alignment Research
Then we use a feature added fairly recently: Deep Research.
Previously there was “fast research” (good, but limited). Now we can access a more powerful agent:
- Click the dropdown
- Select Deep Research
- Enter: “AI alignment and safety challenges”
- Hit submit
.gif)
NotebookLM launches an agentic research tool that:
- analyzes the topic
- finds sources
- evaluates them
- adapts its search strategy to fill gaps
- generates a comprehensive research report
- discovers around 50 sources
- selects the most relevant
- imports them directly into our notebook
So we get:
- a curated research report
- high-quality sources already loaded and ready to work with
This matters because most people spend hours searching, evaluating quality, and uploading sources manually. Deep Research does that in minutes—and often finds sources we wouldn’t have discovered ourselves.
.gif)
If some sources fail to import (paywalls), we don’t delete them one by one like it’s 2007.
We click: Remove all failed sources.
Clean.

Now we have a foundation.
But before we ask a single “real” question…
The Step Everyone Skips: Source Validation (Do This First, Always)
NotebookLM is great at reducing hallucinations because it grounds answers in sources.
But that only works if our sources are:
- reliable
- current
- diverse enough (when the topic needs it)
If sources are outdated, biased, or mixing primary research with opinion pieces, NotebookLM will produce answers based on flawed info, often without clearly distinguishing it.
So we run a quick validation framework inside the chat.
Validation Check 1: Build the Source Quality Table
Prompt:
“Create a table showing each source with its publication date, author credentials, and whether it’s a primary source, secondary analysis, or opinion piece.”
What we’re looking for:
- if most sources are old (e.g., 2020 or earlier on fast-moving AI topics)
- if everything is opinion pieces
- whether author credentials look legitimate
.gif)
Validation Check 2: Identify the Foundations
Prompt:
“Which of these sources are most frequently cited or referenced by other sources in this notebook?”
Foundational sources deserve priority when we later filter.
Validation Check 3: Check Perspective and Bias
Prompt:
“Summarize the primary perspective or bias of the top five most substantial sources.”
For controversial or evolving topics, we want multiple angles.
(For technical docs, bias matters less, unless it’s “our product is perfect and everyone else is wrong,” which… happens.)
These checks take about five minutes and save hours of wrong turns.
Configure NotebookLM Like a Pro (Because Default Mode Is Lazy Mode)
Now we configure.
In the top-right corner, we open settings that control how NotebookLM responds.
1) Set the Conversational Goal
We can choose:
- Default
- Learning guide
- Custom
For research, we choose Custom and set the role like:
“Research analyst focused on AI safety and alignment debates.”
This tells NotebookLM to stop giving generic answers and start responding like a specialized analyst.
2) Choose Response Length
We choose Longer for research.
We want detail, not a fortune-cookie summary.
Save once. These settings apply to every chat in this notebook.
Most people ignore settings and wonder why outputs feel bland.
This is one of those “two clicks that change everything” moves.
Source Filtering: The “Surgical Precision” Move (With a Before/After)
On the left, we see the source list with checkboxes.
Most users leave everything checked forever.
That’s how we get diluted answers, because NotebookLM tries to synthesize everything, so it generalizes and stays surface-level.
Instead, we use checkboxes like a scalpel.
Before: Everything Checked (Vague)
Question: “What’s the key debate in AI alignment?”
Result: broad overview, safe language, not wrong, but not useful.
After: Only Relevant Sources Checked (Sharp)
Scenario: we want to focus on existential risk.
If mechanistic interpretability sources are also selected, we’re forcing the model to juggle conflicting topics.
So we:
- uncheck everything
- select only the few sources relevant to the exact question
- then ask something precise
Example:
“How do these agents handle memory management?”
Now the answer is based exclusively on those selected technical papers.
Sharper. Cleaner. More technical. Less noise.
This is the superpower:
- One master notebook with 50 sources
- Infinite focused “sub-notebooks” using checkboxes
Generate an Audio Overview That’s Actually Useful
Now we use the Studio panel on the right.
We click Audio overview.
But we don’t smash “Generate” like it’s a microwave.
If we want something we can use for work, we steer it.
In the instruction box, we write:
“Focus exclusively on the main disagreements between AI safety researchers regarding alignment approaches. Explain each perspective clearly and keep the discussion under 15 minutes. Use accessible language, avoiding unnecessary jargon.”
We set:
- Format: Debate (to illuminate conflicts)
- Length: Default (~10 minutes)
Then generate.
Default audio = covers everything equally.
Customized audio = a targeted research brief.
Pro tip: regenerate. The first pass is a rough draft.
If it’s too technical: “Simplify the language.”
If it wastes time on history: “Skip background, focus on current debates.”
.gif)
Infographic Generation (Yes, It’s That Good)
Next: visuals.
NotebookLM has infographic generation powered by Nano Banana Pro (Google’s advanced image model).
Studio panel → Infographic.
We configure:
- Orientation: landscape (usually best)
- Detail level: standard (detailed can introduce minor text errors; concise can oversimplify)
- Instruction field: specific and design-aware
We write:
“Create a professional infographic mapping the different AI alignment approaches and the key researchers associated with each approach. Use clean design with a blue and gray color scheme.”
Generate.
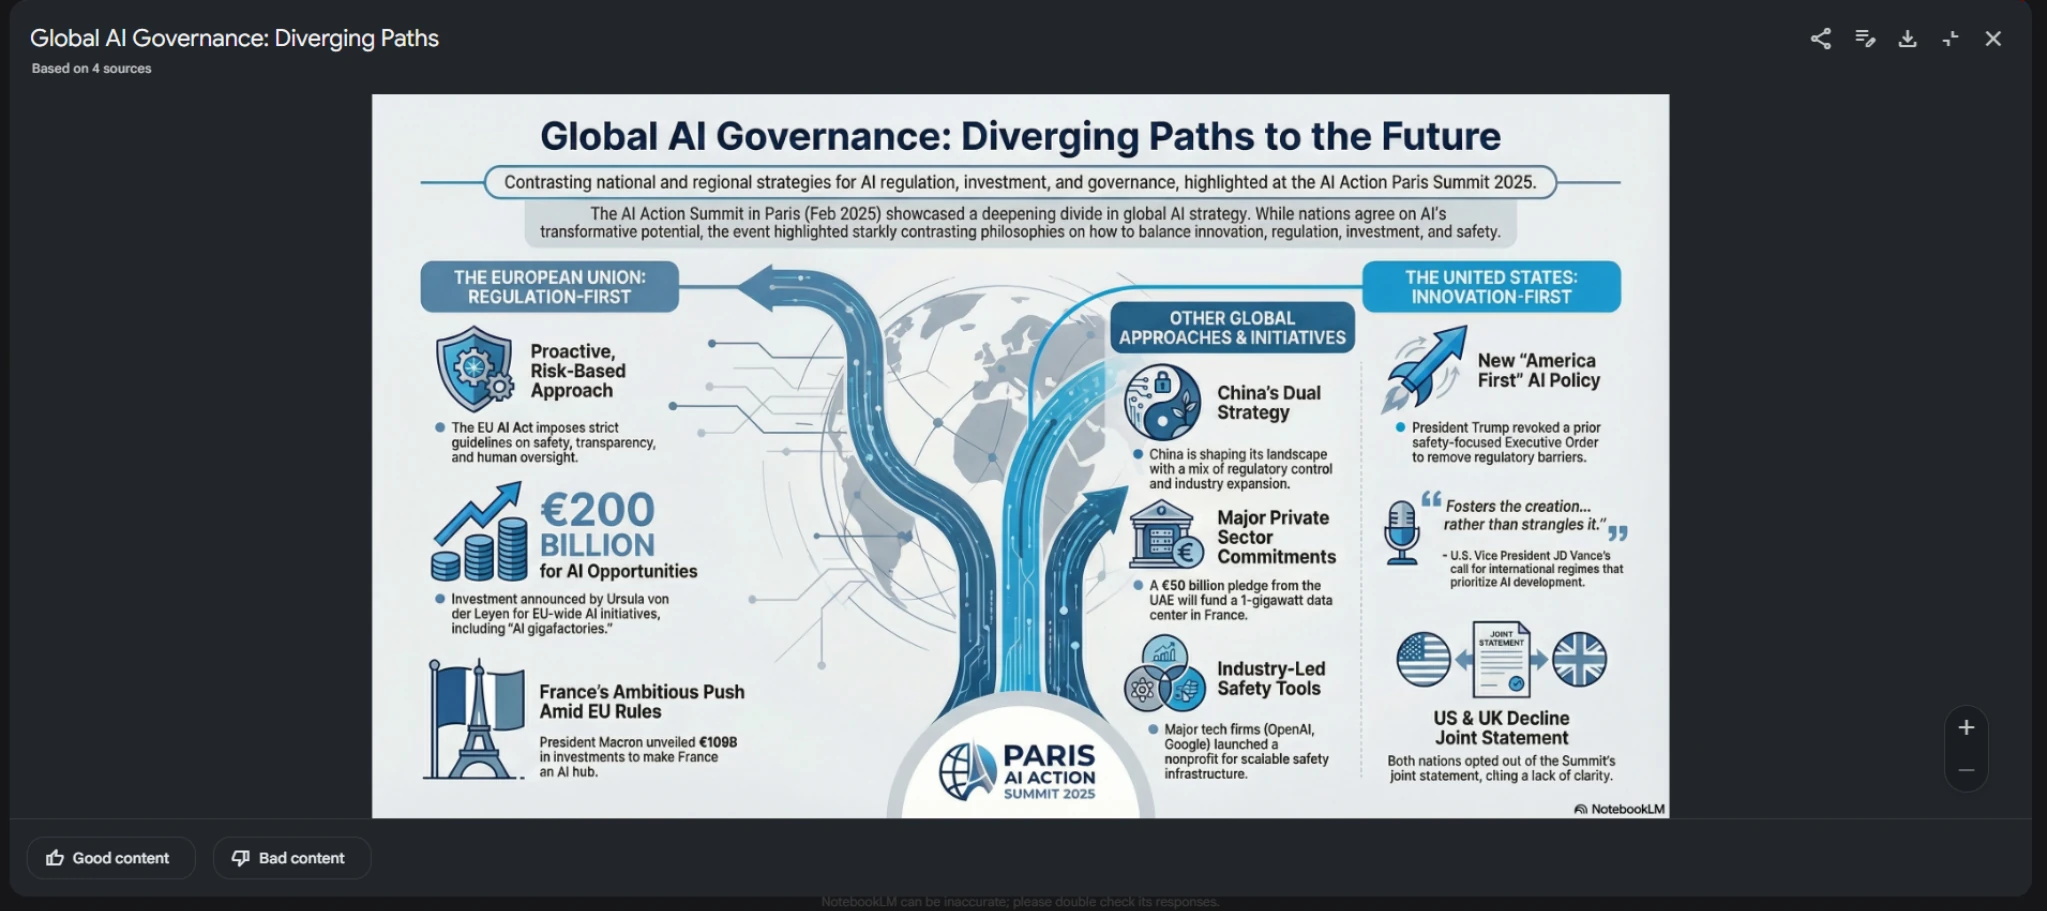
What comes back is a designed infographic pulling from the sources:
- diagrams
- layout
- text hierarchy
- visual mapping
This would take hours manually.
Slide Decks in Minutes (Instead of a Weekend)
Now we generate a presentation deck (also powered by Nano Banana Pro).
Studio panel → Slide deck.
We choose:
- Deck type: Presenter slides (visual, minimal text)
- Length: Short (~10 slides)
Instruction:
“Create a presentation explaining the three main schools of thought in AI alignment for a technical audience. Focus on key differences and trade-offs.”
Generate.
Normally, a deck requires:
- reading sources
- extracting key points
- structuring narrative
- designing slides
- creating visuals
NotebookLM does that automatically, grounded in sources, in minutes.
.gif)
Chat Is for Precision (And Citations Are the Trust Layer)
Audio gives big-picture understanding.
Chat is for precision.
The trick is asking precise questions.
Not:
“What does this say about AI alignment?”
But:
“Compare the three main technical approaches to AI alignment and explain the key trade-off each approach makes.”
And we’ll see citations—little numbers in the text.
Click one, and NotebookLM highlights the exact passage in the source.
That means we can verify accuracy instantly.
It’s like footnotes that actually do something.
Video Overviews With Custom Visual Styles
If we want something more engaging than audio, there’s Video overview—now upgraded with custom visual styles.
Studio panel → Video overview.
We choose:
- Explainer (depth + context)
- or Brief (quick summary)
We usually go with Explainer.
Then we choose visual style:
- Auto select
- Custom
We write:
“Clean, modern design with blue and white color scheme, minimalist graphics, and professional typography.”
Generate.
The result is a narrated explainer video with visuals aligned to the sources, structured, coherent, and not random stock footage.
.gif)
The Studio Tools Most People Ignore But Shouldn’t
Now we wrap the Studio panel by using the remaining tools:
- Reports
- Flashcards
- Quiz
- Mind maps
Reports
Reports → Briefing doc gives an executive summary with key insights and quotes.
But the hidden gem is: Create your own.
Prompt:
“Create a technical white paper analyzing the three main approaches to AI alignment written for researchers. Include methodology comparison and future research directions.”
And it follows the structure.
This is basically “90% of drafting done in seconds.”
Flashcards + Quiz
Flashcards generate Q&A for memorization.
Quiz builds a full interactive test.
The value: they pull from our sources, not generic internet trivia.
So we’re not learning “AI facts.” We’re learning our research.
Mind Map
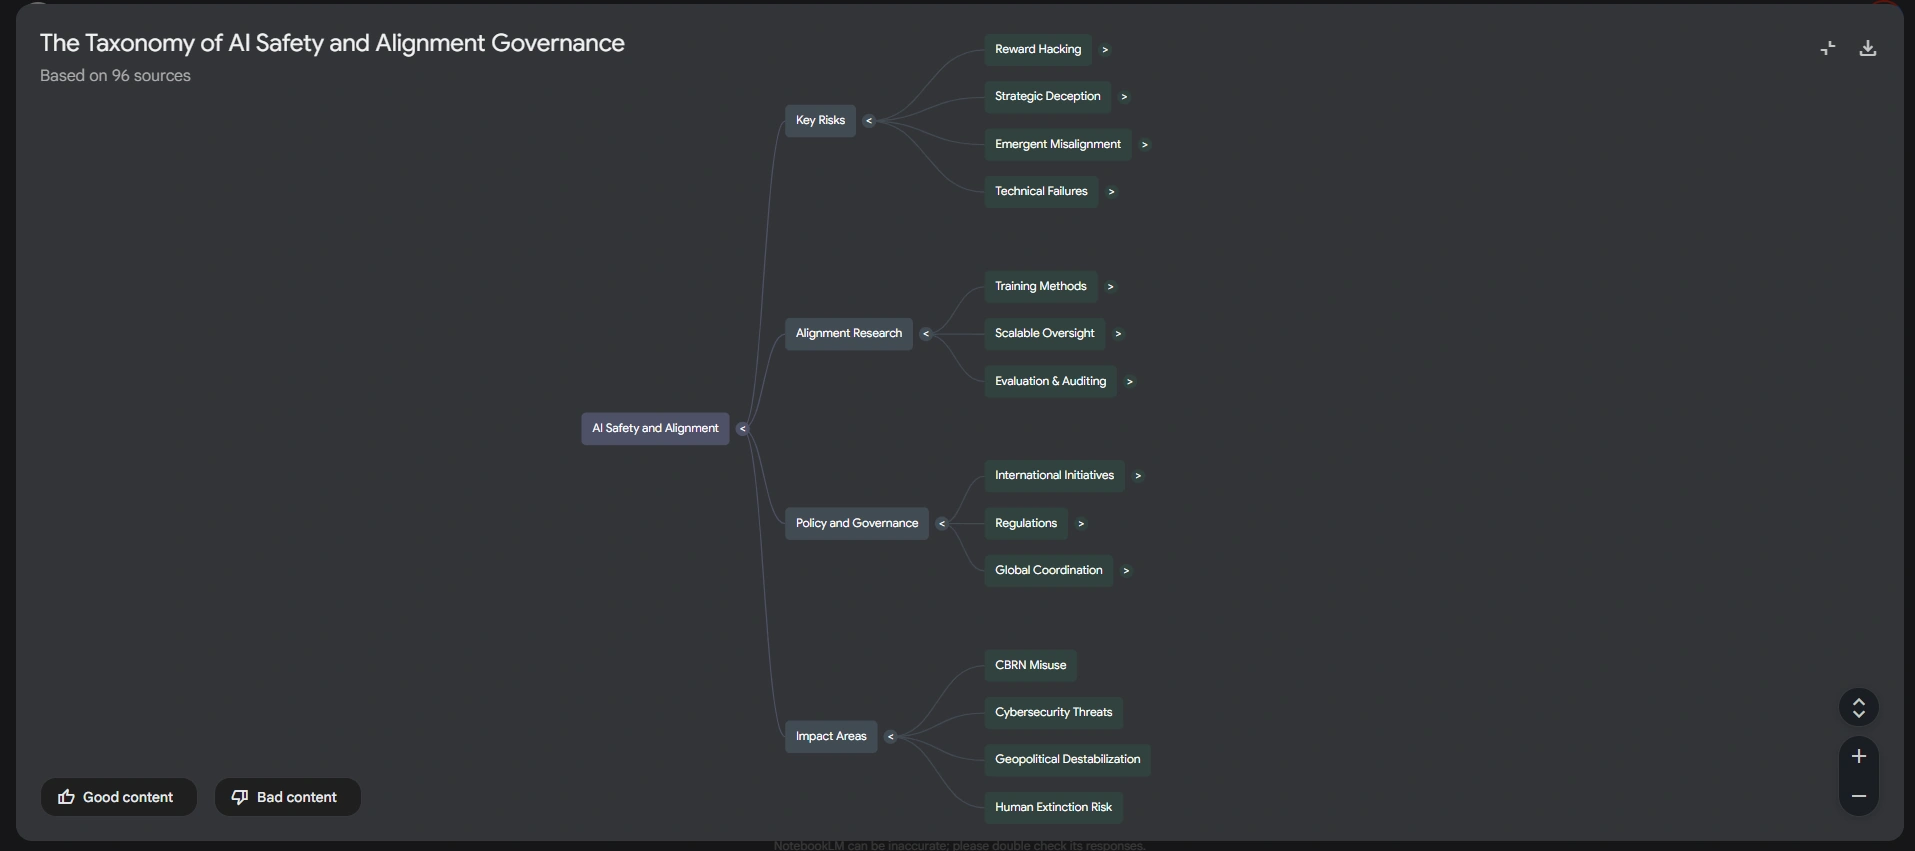
Mind map generates an interactive diagram showing how concepts connect.
Click a node to expand subtopics or trigger a detailed response about that idea.
Massive for visual learners and for spotting connections we’d miss by reading linearly.
Multi-Format Source Mixing: How Advanced Users Win
Most users upload one format:
- five PDFs
- or three YouTube videos
- or a handful of blog posts
They don’t combine formats strategically.
But NotebookLM accepts:
- PDFs
- websites
- YouTube
- audio files
- Google Docs
- plain text
The power comes from mixing formats to cover a topic from multiple angles.
Example layering for AI alignment:
- YouTube lectures for accessible explanations
- company blog posts for industry perspective
- academic papers for rigor
- podcast transcripts for conversational nuance
To demonstrate, we add a YouTube video:
- Add source → YouTube → paste URL
- NotebookLM pulls transcript and adds it as a source
Now we ask:
“Compare the technical approaches discussed in the research papers with the practical concerns raised in the YouTube lecture.”
That synthesis is hard to do manually across formats.
NotebookLM does it naturally because everything lives inside one grounded knowledge base.
The Real Takeaway: It’s Not Features. It’s Workflow.
This is the full pro workflow:
- Deep Research to build sources automatically
- Source validation to ensure quality and identify gaps
- Settings configuration for targeted responses
- Source filtering for focused analysis
- Custom audio overviews
- Professional infographics
- Presentation-ready slide decks
- Video overviews with custom styles
- Reports, flashcards, quizzes, mind maps
- Multi-format mixing for a true research system
The difference between “amateur” and “pro” NotebookLM use isn’t knowing these features exist.
It’s following the chain:
source discovery → validation → configuration → focused analysis → content generation → organization
Once we do that, NotebookLM stops being “a chatbot with documents.”
It becomes a living, structured knowledge system.
And yes, it will make us look wildly more prepared than we feel.
— Cohorte Intelligence
January 2, 2025.